College Girl Hat

Inspired by Jane and Kate (my college girl and my soon-to-be college girl), I designed a new hat pattern! The College Girl Hat! It's a fun one...super squishy yarn and chunky cables. I even added a cute faux fur pom! It takes one skein of bulky yarn and knits up super fast....perfect gift knit! I've already made a good half dozen, with yarn for many more beckoning me to sit and knit in front of my favorite holiday movies. Love Actually, anyone?You can find the pattern on Ravelry. And it's on sale through this Friday, 12/13/19, for $2.50.I'd love to see your hat when you make one. Tag me on Instagram (@houseonhillroad) and use the hashtag #collegegirlhat.Happy knitting, friends!

Let's call it a Do-Over

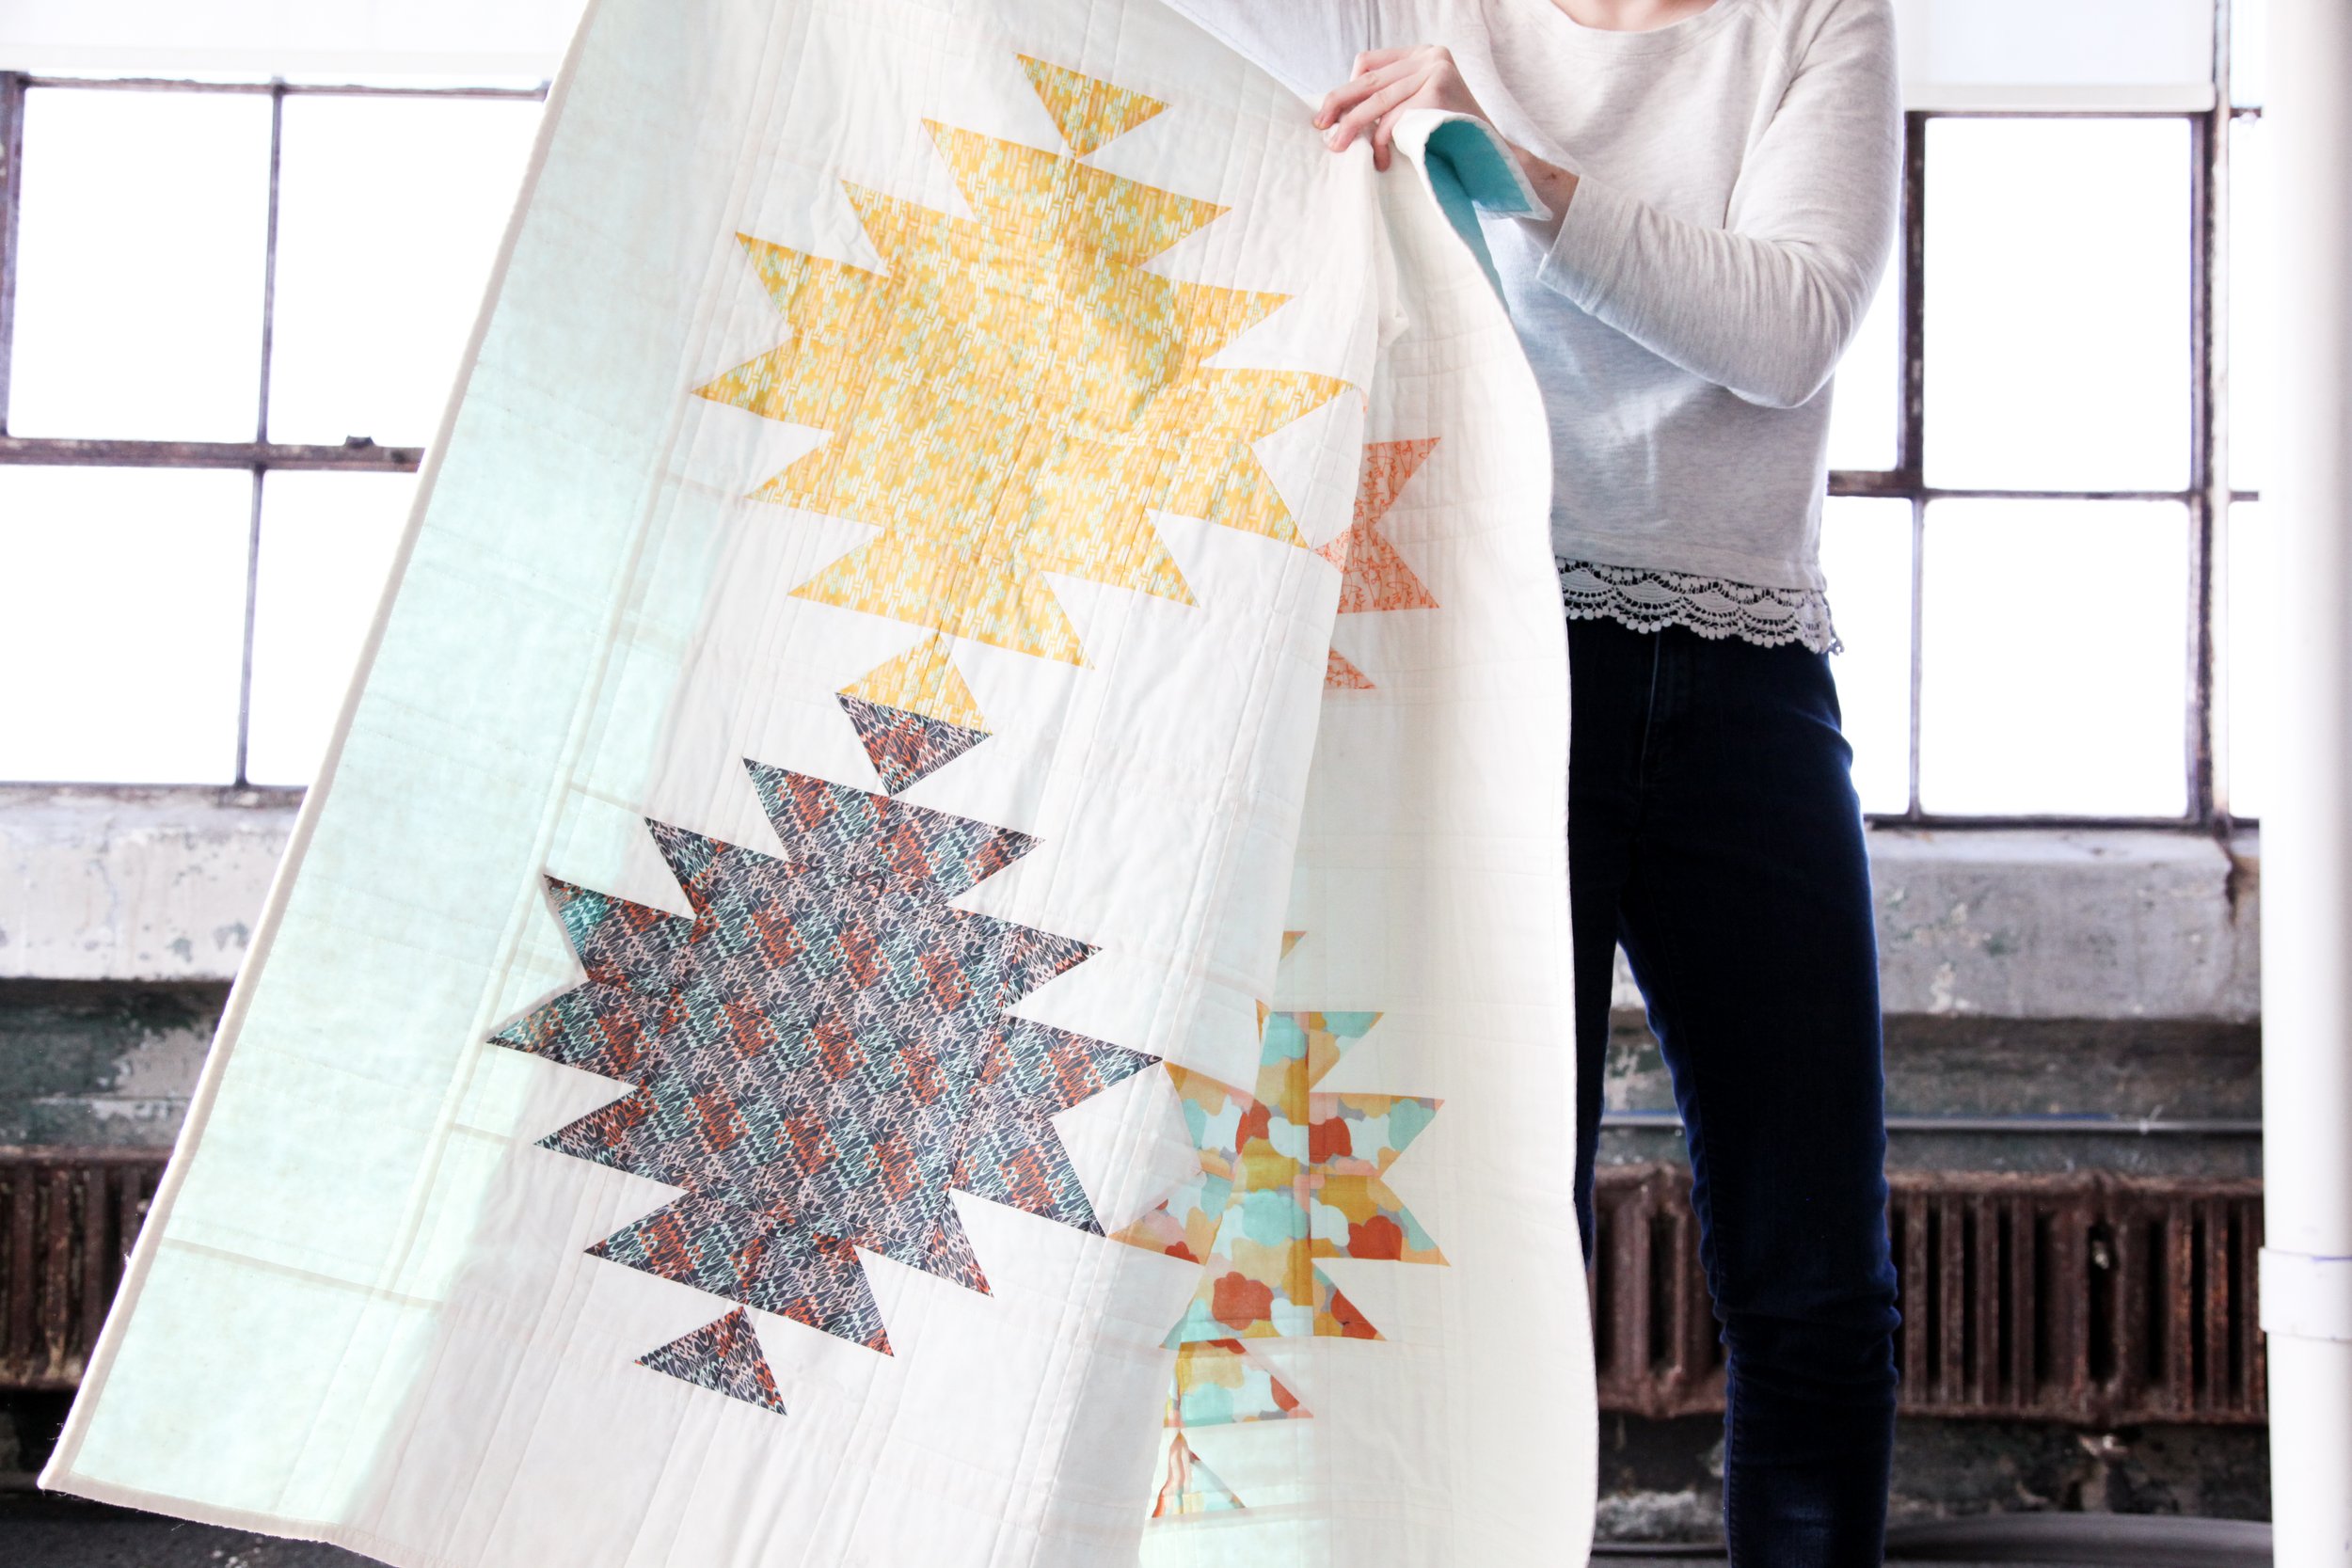
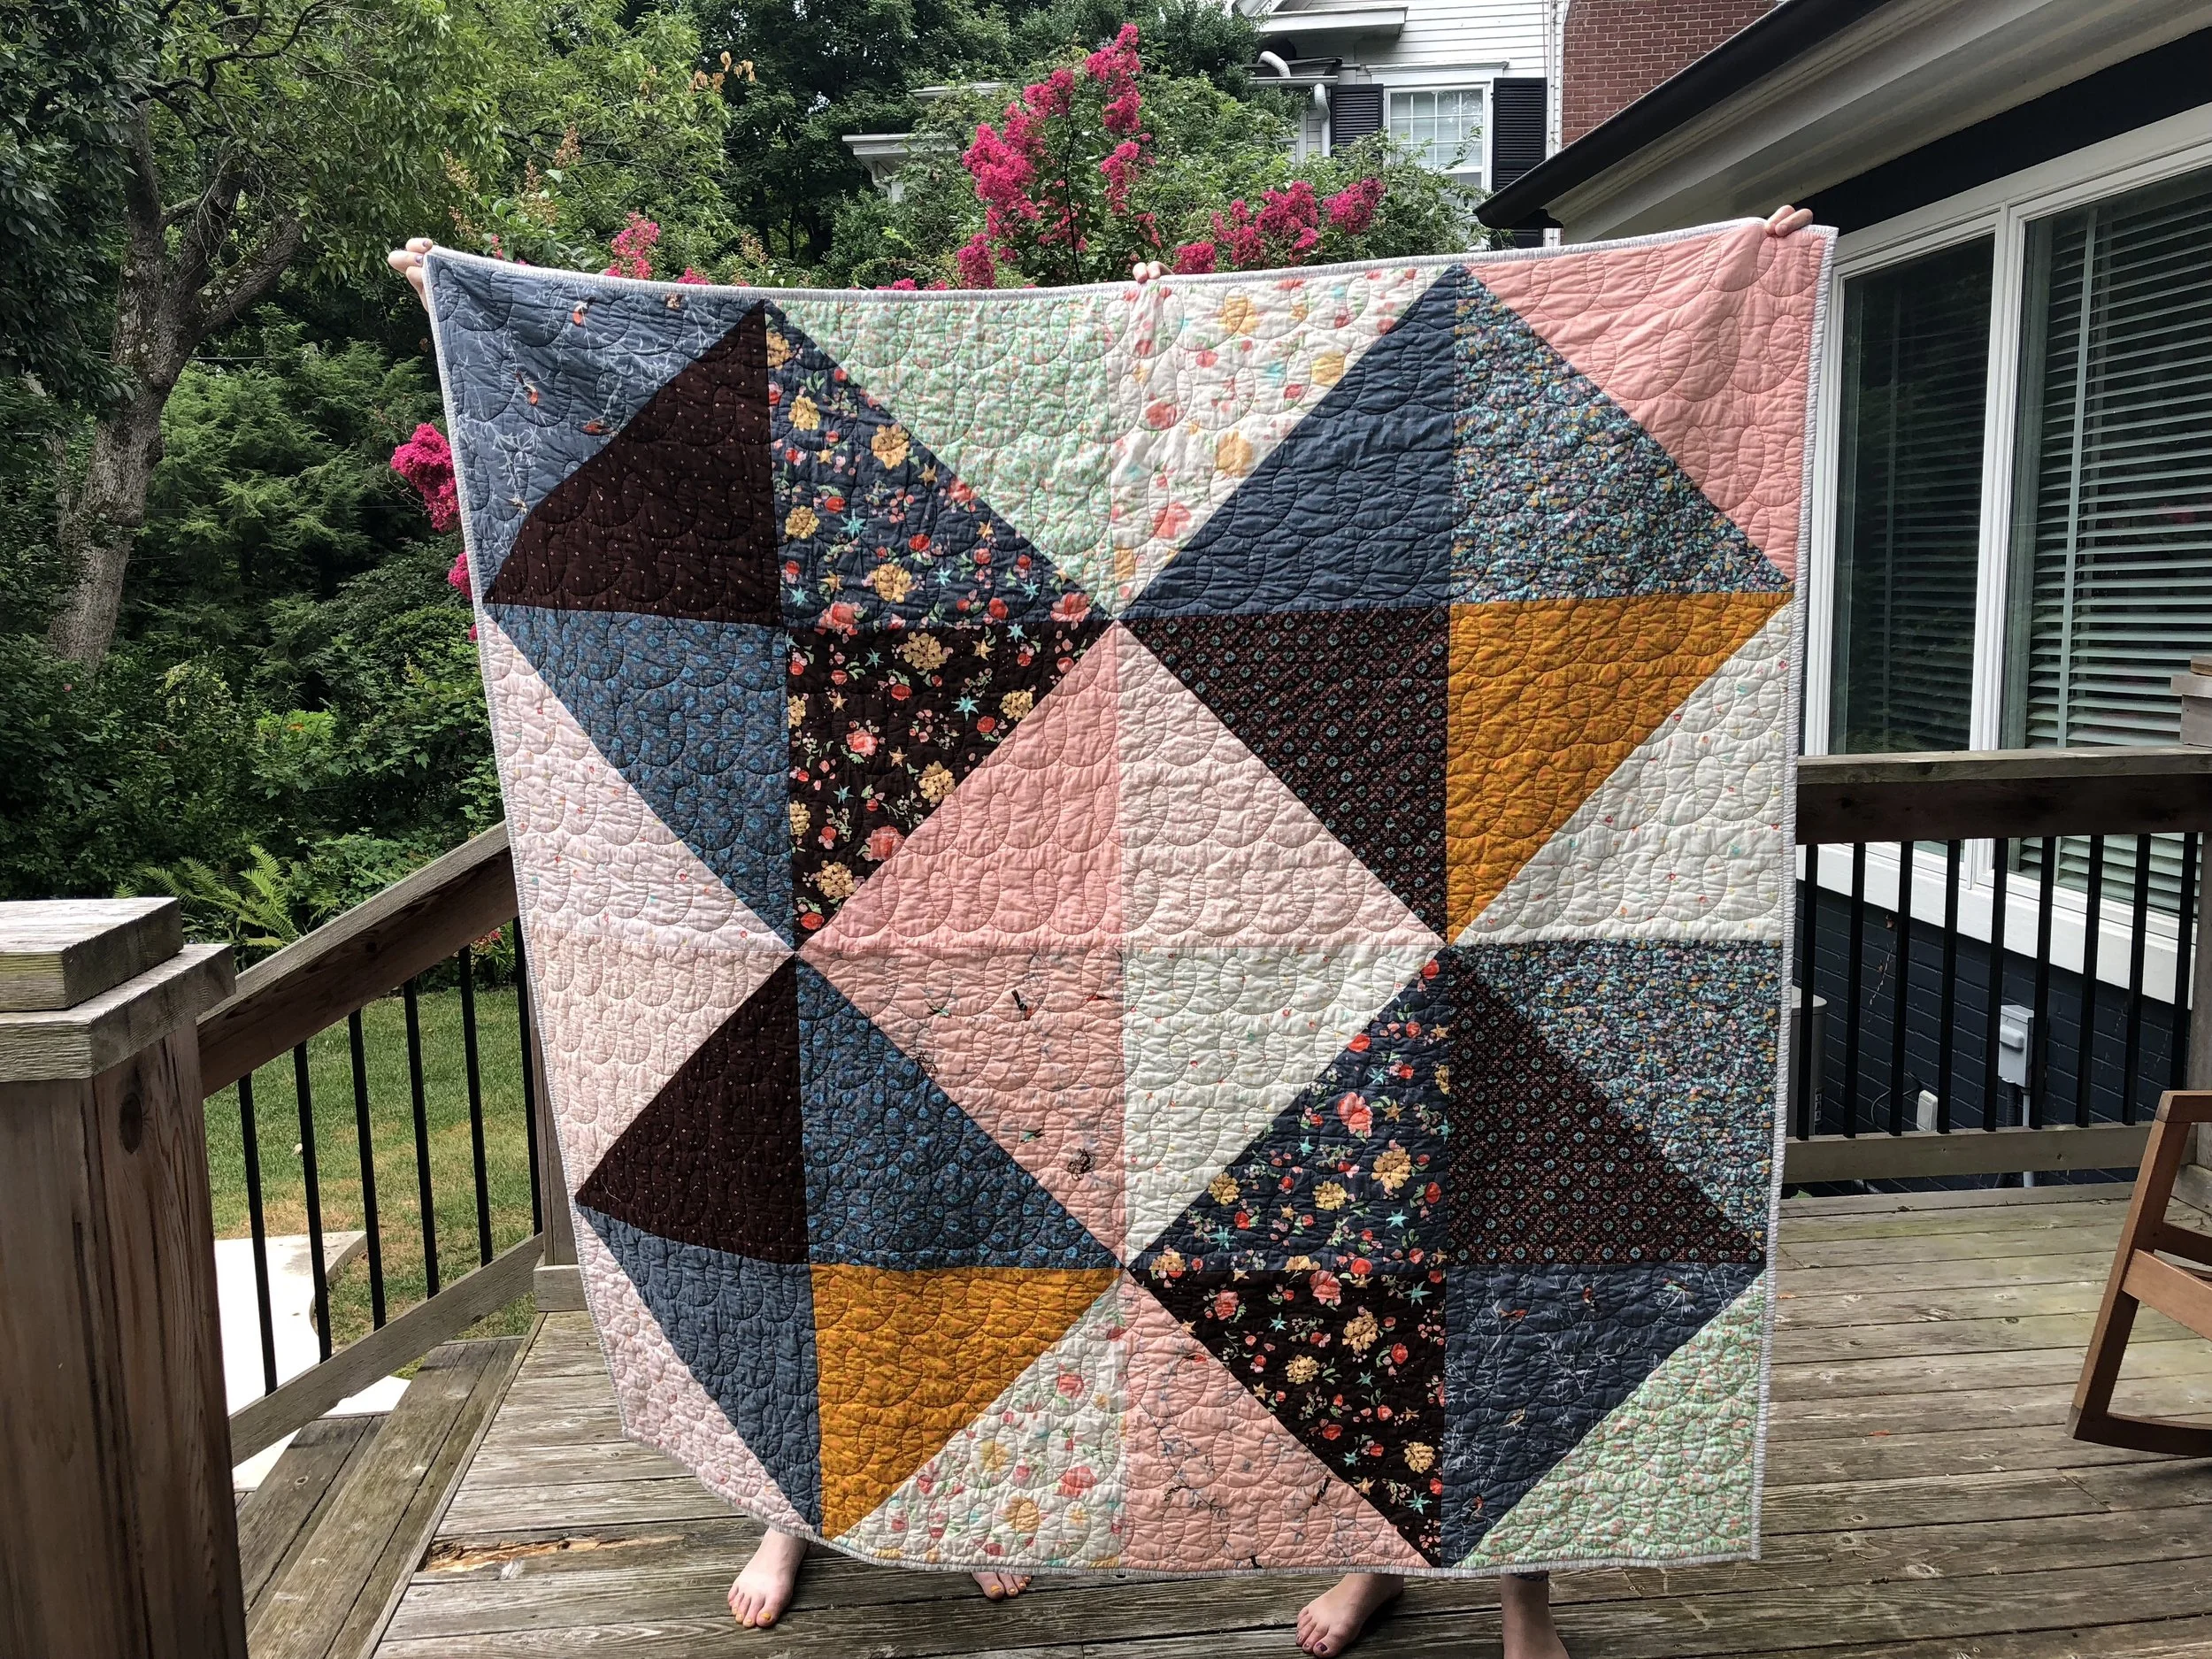
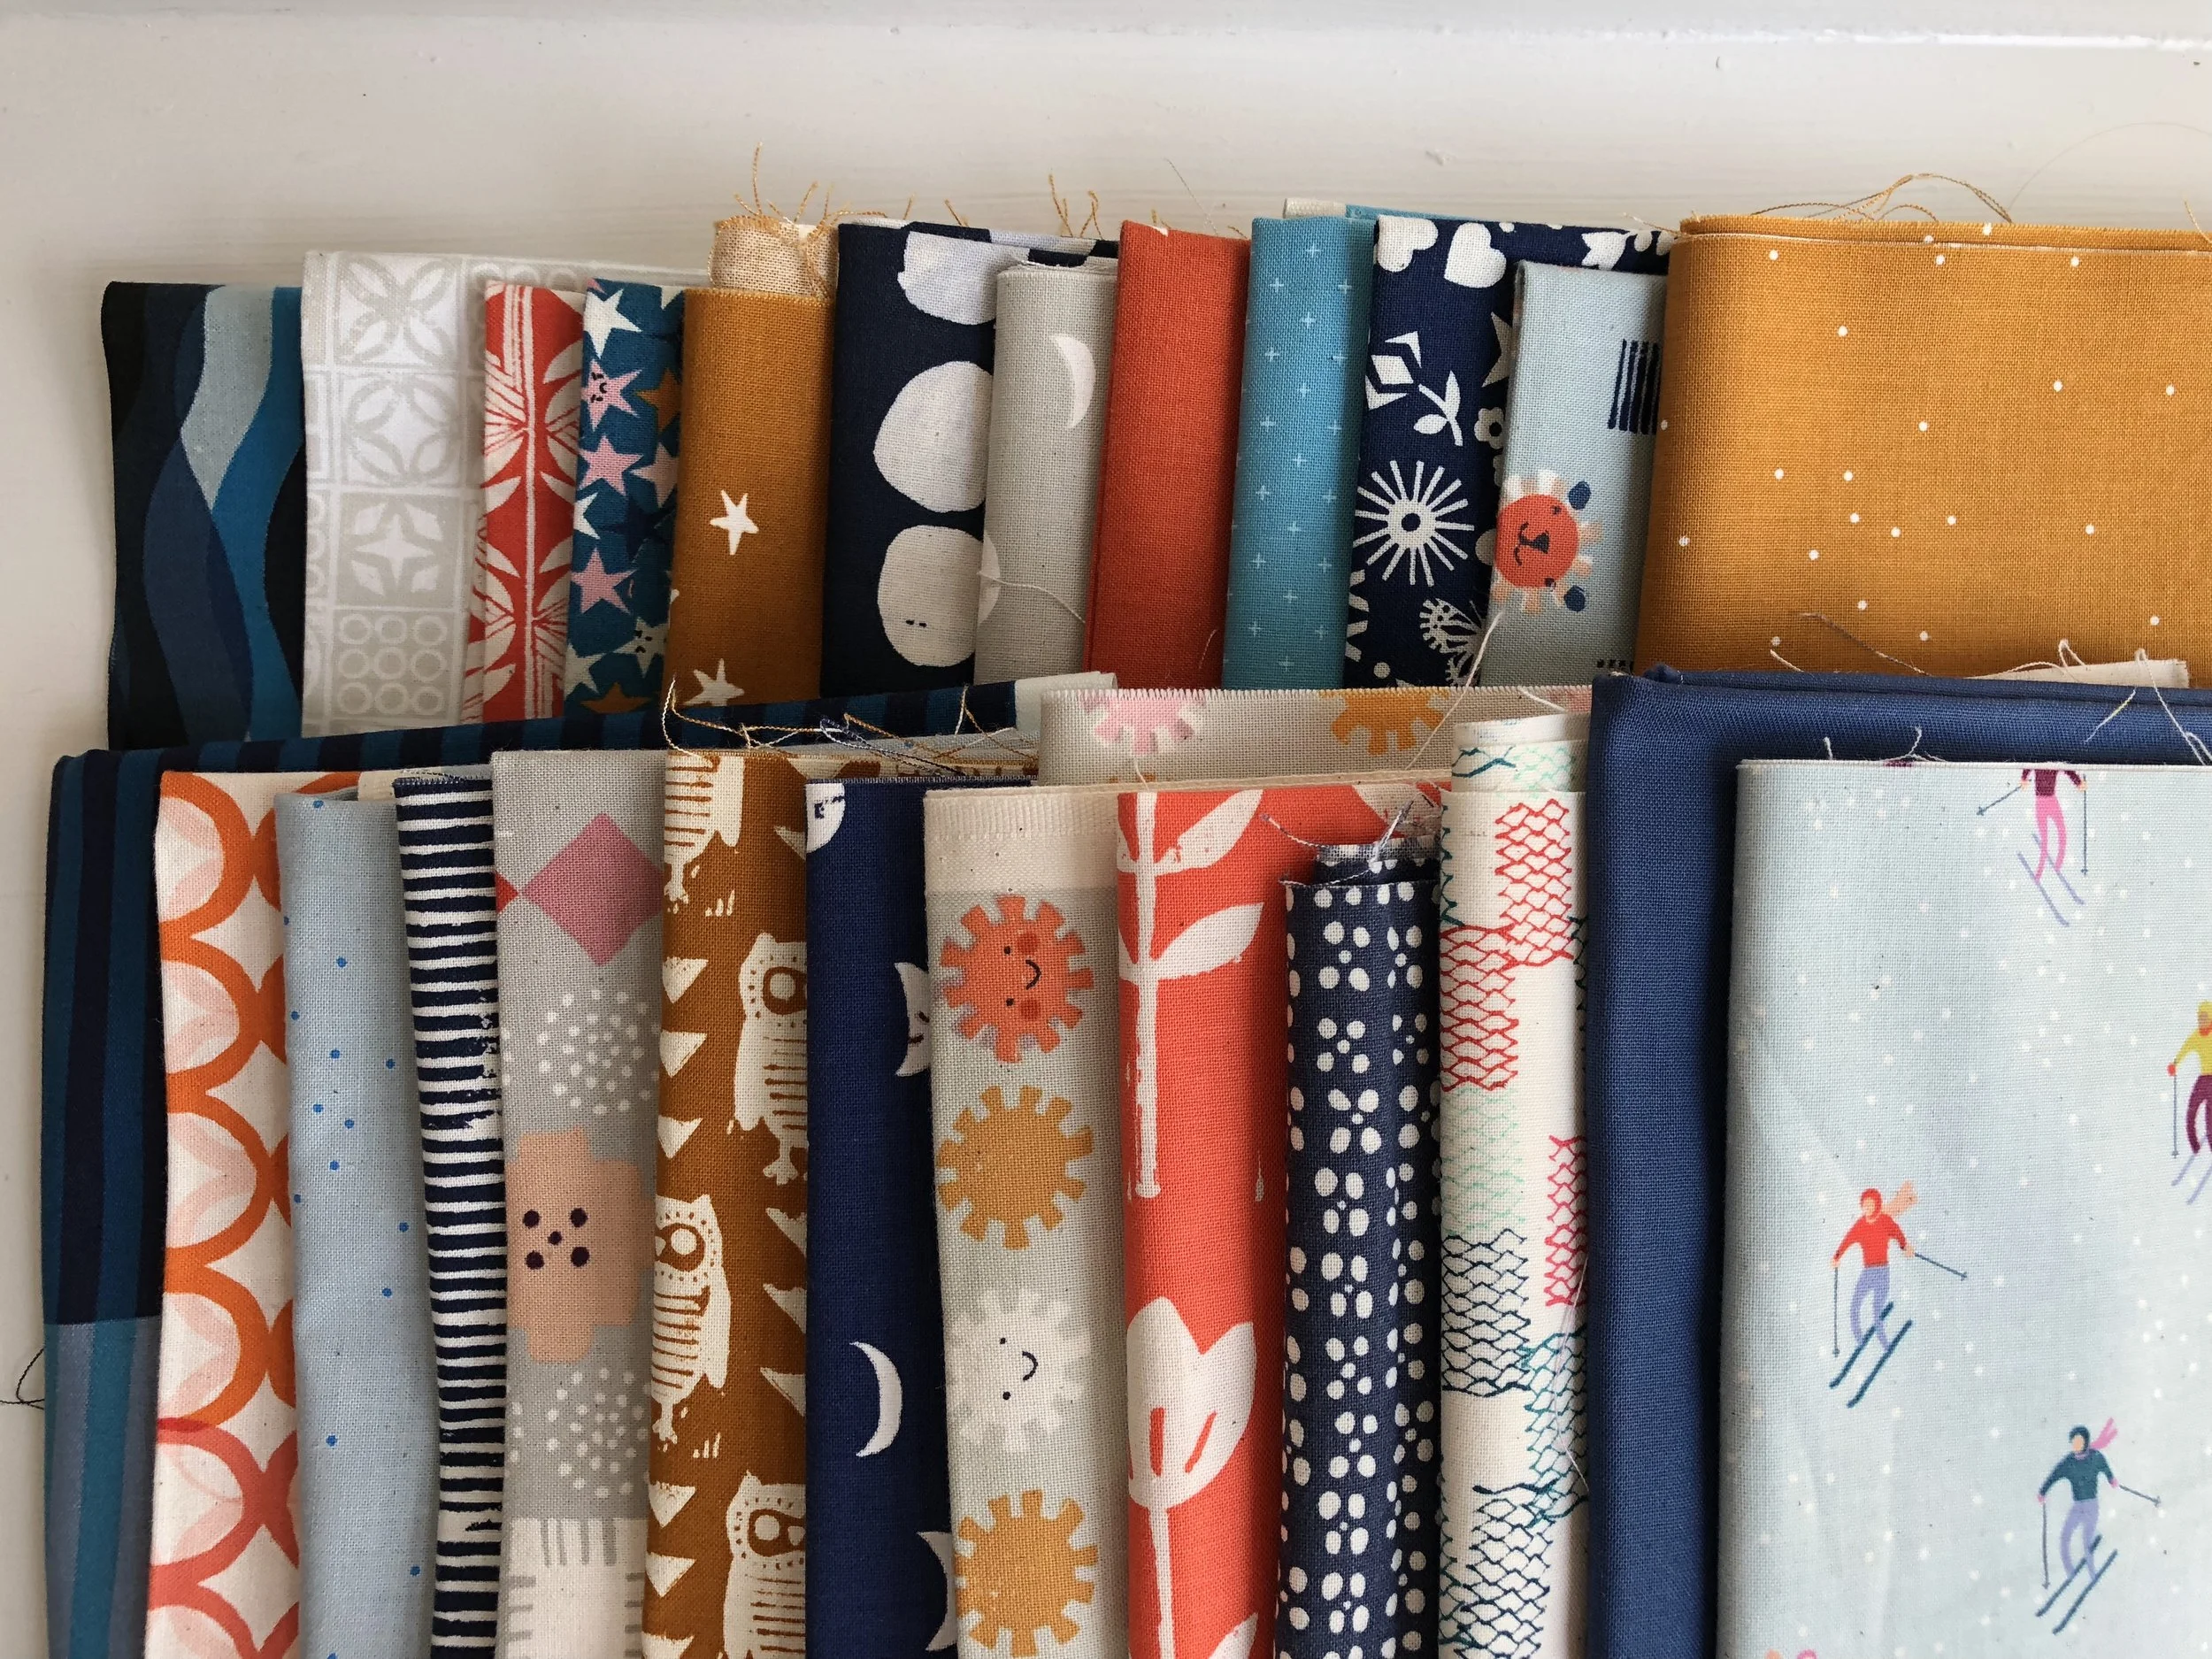
Last spring I was contacted by the team at Quiltfolk and asked if I was interested in being profiled for their upcoming Kentucky issue. I don't think I could respond to that email fast enough...the answer was a resounding, "YES!" I have been a subscriber to the quarterly magazine since its second issue and I was so honored and humbled to be asked to represent a slice of quilting in my home state. The day the team arrived at my house, I was so excited to show them my work and talk about what I create and why I quilt. It was so much fun having them here and the two hours they spent with me seemed to fly by. The conversation was mostly between one member of the team and myself while the two others flitted around, styling and taking photos. We talked about how I started sewing, the early days of this blog, how my focus shifted towards quilting, the books I have written and how I give away most everything I make to family, friends and charity. The team was warm, friendly to Kate (the only other person home) and kind to my dog (sadly, she passed away in July - I still miss her). It was a wonderful experience and I felt so good about all of it. I was told the issue would be out in October and that there would be some back and forth before then. Then off they went to their next appointment.My subscription issue arrived at my house the first Friday in October. I knew it was on its way and was so so so excited to see the Kentucky issue and to read the story about me. As I read the first paragraph, my heart sank and I started shaking. They got so much wrong, including Fatty's name, my niece's name and the name of our business. I couldn't believe what I was reading. I started crying. I was shocked. And disappointed. And embarrassed. These were big mistakes.I emailed Quiltfolk after I read the article and pointed out the larger errors. I told them how sad and disappointed I was.I received a reply within an hour. They messed up and admitted it. They apologized and took full responsibility. Then we began to work together to make things right. They were extremely responsive, answering my questions and communicating their thoughts and plans with me as they unfolded. The publisher, Michael McCormick, wrote a heartfelt apology, which you can read here.I have the utmost respect for Mike, Mary Fons, the rest of the Quiltfolk team and the publication itself. They handled this unfortunate situation with grace and worked to make sure that I felt good about it. And I do. Their apology is sincere and they also emailed all their subscribers a corrected version of the story, which I hope you will take the time to read. After all, I was very excited to be part of this magazine and I am proud of what I do.Part of being a creative person is making mistakes and learning from them. I tell the eighth graders in my sewing class that I use my stitch ripper daily because I do. I've cut fabric incorrectly, set quilt blocks upside down, and cut two right sleeves for a blouse instead of a right and a left. I've unraveled hours of knitting when sweaters turn out the wrong size, a dropped stitch wasn't noticed or the color work is off. I once baked a cake and forgot the eggs - into the garbage it went. And these are only the crafty mistakes! I've made my fair share of personal bumbles, too. I understand that mistakes happen because I make them myself. On the regular. I am human and part of being human is screwing up sometimes. The key is to admit it and apologize when necessary. Then figure out why it happened and learn from the error. Fix it if you can or, if not, start over.I am grateful to Quiltfolk for admitting their errors, apologizing and fixing what they could. Everyone deserves a chance for a do-over.

Patchwork Camera Strap Tutorial

Hey there! Long time, no see. I am happy to be back in this space (always!) with a tutorial to share with you all.

Some of you may remember that I used to make patchwork camera straps and sell them periodically. I recently had the opportunity to make one for Bonnie Christine's newest fabric line, The Open Road, for Art Gallery Fabrics. Because I am not interested in making these to sell any longer, I decided to write up a tutorial for any of you who are interested in making your own.

For one patchwork camera strap you will need:

fabric scraps, at least 4" wide in one direction. (Tip: go for a variety of patterns in different scales for the most successful combination.

fusible, mid-weight interfacing cut to 3" x 24" (I like Pellon Decor Bond)

polyester thread - I use white on the patchwork and black on the strap ends.

spray adhesive (I like 505 brand)

sewing machine with a walking foot

You will also need:

scrap of marine vinyl or leather for strap ends, at least 4" x 4" - cut 4 strap ends using the template. Download the template HERE

3/8" nylon webbing (two lengths of 16" each) and two each 3/8" triglides (the adjustable hardware on the strap) and 3/8" keepers.

Gather your fabrics and take some time to arrange them in the order you like. You will want to have a finished length of patchwork that is 4" x 25". I often cut the fabrics on each end of the strap longer than I think I will need and then trim to 25" after it is sewn.

2. Sew the fabrics rights sides together, using a 1/4" seam allowance. Press the seams open.

3. Center the fusible interfacing on the wrong side of the patchwork strip and fuse it in place. There should be 1/2" of fabric showing on all four edges.

4. Press the excess fabric towards the interfacing along both long edges. The short edges should remain unpressed.

5. Fold the strap in half, matching long edges and press it along the folded edge.

6. Stitch the opening closed 1/8" from the open edge. Then sew another line of stitching 1/8" from the folded edge. You do not need to sew the short edges.

7. At this point, you can add additional stitching if desired. It is my opinion that this increases the strength of the camera strap. I sew down the center of the strap and then between the center line of stitching and each edge.

8. Cut four strap ends using the template provided above. Spray the wrong side of the strap ends with your spray adhesive. I like to do this by placing the strap ends in a cardboard box and taking the whole set up outside to do the actual spraying.

9. Place one strap end right side down on a work surface. Place the camera strap on the strap end so it extends almost the full length of the wide part of the strap end.

10. Place one 16" length of the nylon webbing over the short edge of the strap end so it extends 1/2" on to the patchwork strap.

11. Place a second strap end on top, matching up edges with the bottom strap end and enclosing the nylon webbing and patchwork strip. The spray adhesive keeps everything in place so you will not have shifting when you move the strap to the sewing machine.

12. Using the walking foot and referencing the photo and diagram above, first sew around perimeter of the strap end (shown in red). Backstitch over the nylon webbing to give it extra security. Next, sew a rectangle with an X (shown in yellow) to reinforce the strap end.

Repeat steps 9 through 12 with other end of the patchwork strap and the remaining two strap ends.

13. Thread a keeper and then a triglide on to the strap.

That's it! If you have questions, please ask them in the comments and I will answer them there for everyone's benefit. If you make a patchwork camera strap using this tutorial, I'd love to see one. You can tag me @houseonhillroad on Instagram .

I hope your summer is going well. See you soon!

Tutorials Comment
Super Squash Blossom in Jump, Ride, Spin Fabrics

I'm excited to share some new things with you today! My friend, Tracey Wirth, has a new line called Jump, Ride, Spin with Paintbrush Studios Fabrics and it is adorable! The prints are fun, cute and come in great colors - fresh hues of yellow, orange, green, pink, blue and gray. They are so versatile and are perfect for all kinds of project. Naturally, though, I made a quilt!

I made a baby size of my newest pattern, Super Squash Blossom. These oversized blocks come together quickly and work well in large and small scale prints like the ones in Tracey's line. I decided to to use the gray, orange and yellow colorway and backed it with a nice aqua solid. They really pop against the white background!

It's been a longtime dream of Tracey's to design fabric and I couldn't be more thrilled to see it become a reality! Her fabrics are whimsical and fresh and would be good for so many projects. You can see more ideas of how to use them on the Paintbrush Studios Blog. The pattern for my quilt, Super Squash Blossom, is available in my shop. Take 25 % off through Sunday, December 9th with the code JUMPRIDESPIN.

Uncategorized Comment
Three Quilts in One Post

Last time I popped by, I had a pile of quilts to bind, a dorm quilt to finish and the end of summer to savor. I am happy to report success on all fronts! (Still working on those bee blocks, though. Sigh.) Three of the quilts in the aforementioned pile were donated to the girls' elementary school for their annual summer carnival. At the two-day event, there is a quilt booth where you buy chances on a wheel. Once all the chances are sold, the wheel is spun and the winning number gets to choose which quilt they would like to take home! This process repeats until all the quilts are spoken for or the carnival comes to an end. I donate to this event every year and just love hearing afterwards who took my quilts home.

This is the Libby Quilt which I had the pleasure of testing for Erica of Kitchen Table Quilting. It is a very fun quilt to make. The cutting and the piecing take very little time and I love that it works well with large and small scale prints. For my version, I chose to use Heather Ross's Sugar Plum line - it definitely has a Christmas vibe to it! I quilted it with different motifs on the stripes and a swirly thing in the background pieces. I had a hard time parting with it, but you can only have so many Christmas quilts and we are at our max here. It makes me happy knowing it ended up in a great place, with a sweet little girl who will love it for her own.

And speaking of Erica, I used one of her big block patterns (February!) to make this next quilt. I bought a fat quarter bundle of this Robert Kaufman lawn, Woodland Clearing by Liesl Gibson (out of print), last summer while traveling in Michigan. Paired with Kona cotton in Grass (one of my favorites!), these 36" blocks really shine! I free motioned a double orange peel design for the quilting and I really like how it turned out. The backing is a lawn floral print from the same line with all the front colors in it. You'll just have to trust me that it is beautiful because I forgot to take photos of the back!

The final quilt in the donated trio was also made from the same fat quarter stack as the one above. This quilt is entirely made of lawn, including the backing fabric (it's a solid aqua). I cut the fat quarters into 18" squares and then made half square triangles. It's a good reminder that simple shapes on a large scale pack a punch and really give you the opportunity to show off the fabric, play with value and scale. I quilted this with my very favorite loops on the long arm at Quilted Joy (where I quilted the other two as well!). I don't think I will ever tire of this pattern. It just works well with so many different quilt tops and is easy to achieve.Back soon with the dorm quilt! Pinky swear.

Summer Studio

The way I work in the summer is extremely different than during the school year. Nine months of the year, you can find me in my studio for a block of time while Fatty is at work and the girls at school during the week. The exact hours may vary, but they generally happen most days. During summer, though, there is no predictable pattern as to when I can work or how much I can get accomplished. It's important to me that I am available for the girls when they need me or want to do something. I used to get extremely frustrated if I wasn't able to get a sizable amount of work accomplished. A few years ago, I realized that I was setting myself up for failure and decided that I would take the summers off. It's worked really well for me. Anything that gets finished is a bonus and the time away from deadlines allows me to recharge creatively. Blair wrote some interesting thoughts about her experience with stepping back a bit this summer that I enjoyed reading. It seems like maybe we all need a break now and again.That said, I am still getting stuff done this summer. Funny how lowering my expectations allows me to make more! In my last post I mentioned that I had 6 quilt tops and backings ready to go. I rented time on a long arm over a few different days and quilted all six quilts. This past weekend, I squared them all up and made the bindings. My goal is to have them all bound by this weekend. Don't freak out - I'm definitely machine binding them all! While I love to hand bind, most of these are slated for donation and my deadline for those is next week. Most of my sewing these days is accomplished in 10- to 60-minute windows between other tasks and even while dinner is cooking. Those small blocks of time really add up quickly!

I'm also working on the Jane's dorm quilt. I cut strips, threw them all in a bag and pulled them out in pairs to sew together. Once the pairs were sewn, I made groups of four and then groups of eight. Next up is figuring out a layout. That's my favorite part, really. I love to see all the pieces come together. Backing has been purchased and I will be scheduling long arm time soon. Time is really flying by and I know mid-August will be here before I know it. I am so, so happy that I got a good start on this early enough in the summer to enjoy the process instead of panic sewing at the last minute.

Since I cleared the decks of many of my works in progress, I'm jumping in and quilting-along with Pattern Drop. I just love the bee version of this month's quilt. The firefly option is super cute, too. If you are interested, it's not too late to join. All the details are on the Pattern Drop blog.That's what is currently happening in my studio. How about you? What are you working on this summer?

Another Day, Another Quilt

I recently did a mini clean up in the studio and at the end I had six quilt tops (with their backs!) waiting for quilting. There are also two quilts that just need to have the blocks sewn together. Honestly, I have no business starting another quilt top until some of the unfinished become finished. But a quick look at the calendar tells me that time is flying fast and there is one quilt on my to-make list that has a firm deadline. Two months from today, Fatty and I will move Jane into her college dorm room.Let that sink in.Of course, I am cutting into that pile of fabric. She gave me a color scheme and I pulled the prints. I showed her some ideas and we came up with a loose plan that I will execute improvisationally. I am going to savor every cut and every stitch of this one. I know that keeping my hands busy helps me when I am anxious and excited and heals my heart when I am sad. I need to make this just as much for me as I do for her. I plan on pouring all of my love into this quilt so she can take a small piece of me with her when she goes. Wish me luck.

Summer Sewing

Hello there! Hope your summer is off to a good start. I've got loads of sewing projects lined up - mostly quilts, but maybe some clothing, too. I've had a lot of these roaming around in my head for awhile and now that Jane's graduation has come and gone (sniff), I finally feel as if I have some time to devote to them. One of these quilts is one that I have made twice before, but I wasn't really pleased with some parts of it. I knew that there had to be a better way. I woke up on Monday morning and my sleeping brain had figured it out. I love it when that happens! I quickly pulled the stack of fabrics above so they would be ready for cutting as soon as I had a chance. And yesterday was the day. I took my rotary cutter, ruler and the fabrics down to the family room for a cutting session in front of the TV. I pulled my extra cutting mat out from under the couch (I keep one there for moments like this!) and set up a little ironing and cutting station. I had forgotten that working somewhere other than the studio can be super energizing. It worked - I got an entire twin quilt cut out, the math bits figured out for the pattern and the pattern written up. I haven't been that productive work-wise since I don't know when.Can we talk about these fabrics for a quick second? I am just smitten with this palette - purples, pinks, oranges, golds. It's not my normal go-to (no green! no blue!), but they are calling to me so I am running with it. These are all Anna Maria Horner prints, from her latest line, Sweet Dreams. That lady does color like no other! Like the shift in my work space for yesterday, the shift in the colors I am working with is energizing me. I am excited to start sewing this afternoon!Finally, as a bit of an aside, if you follow me on Bloglovin', you have missed a number of my latest posts. So sorry! Apparently, when the blog was moved to the new platform, the feed changed ever-so-slightly and it took a little time for the situation to get corrected. Anyhow, if you did miss something, it was mostly about my new PDF pattern, Rinse and Repeat, that I launched last week. You can read those posts here, here and here. The pattern in available in my shop. [/et_pb_text][/et_pb_column][/et_pb_row][/et_pb_section]